
Sunday, July 31, 2011
Vintage Claire
August Excitement

Here is my first card as guest designer. I decided to create it with the current challenge SDC 35 in mind which is red, yellow, orange. I love the Keepsake Kids and I thought that they would look great sitting on one of the little shrooms. The background is done using the collaged circles from the new Technique Junkee newsletter. The circles are cut from orange, red print, and red and yellow plaid paper. I added my own touch by adding gold spray webbing. I'm looking forward to a month of "Good Things, Good Thoughts."
Check out the Stampotique Designers Challenge Blog and play along with the challenge. The Stampotique Designers blog is filled with lots of inspiration created by the talented design team. Of course, I must mention the wonderful Stampotique Stamps website.
Friday, July 29, 2011
Kind Words

My card started with two stamps. The sentiment stamp is from Our Daily Bread Designs. The image is a floral background stamp from Chapel Road Artstamps. The sentiment was heat embossed with clear embossing powder and the panel was colored with tattered rose distress ink. The embossing serves as a resist. The flowers were embossed with Ranger's California Stucco Embossing Antiquities powder. Both panels were die cut into an oval shape and layered on a scalloped oval panel. I used an EK Success border punch for the ribbon of ovals. The background panel is embossed using a Cuttlebug folder. I used Rock Candy Stickles to add a distressed glitter on the background embossing, on the ovals ribbon, and on the frame around the main ovals.
Check out the blogs of the other players and enjoy the art.
Thursday, July 28, 2011
One More Christmas in July

Wednesday, July 27, 2011
Celebrating a New Stamp Release at Artistic Outpost
It's time to celebrate the holidays Artistic Outpost style with a new release of stamps. There are three fun new stamp sheets to choose from.
 Halloween Treats : Growing up, our Halloween decorations were Technicolor large die cuts of pumpkins and kitty cats and witches on broomsticks. These stamps remind me of those “cardboard” cut-outs. How I wished we had saved them! Try mixing this set with our other Halloween collections as well as Apothecary!
 Frosty & Friends: I love the sweetness of vintage Christmas cards. The secular imagery was dreamy and cute...so sugary sweet my teeth hurt just to look at them. This collection features some of our favorite images from our own AO collection of vintage ephemera.
 Apothecary : Before the invention of the drive-thru Walgreens®, the apothecary was not just a dispenser of medicines, but also a mix-ologist of tonics, keeper of secrets, and giver of advice. Antique apothecary bottles are highly collectible in part due to the “mystery” of what could actually be in them. Our AO stylized bottle has a blank space that our “product” labels fit perfectly into…or hand write your prescription on our vintage Rx pad.
Please note that due to the high volume during new releases, that “mounted” stamp collections may take 10 days to ship. We will keep you posted on your order, and thank you so much for visiting our outpost.
Now to share some of the works I created using these stamps.
I used the Warhol technique to create this card. The kitty was stamped on small tags which had been colored with distress stains. The background is made from kraft glassine paper which was wrinkled thoroughly and colored with distress inks.
You just have to smile when you see the stamps from this set. Frosty was done using the With and Without Collage technique from the April/May 2011 TJ Newsletter (also this weeks Try That Technique challenge) and the torn frame technique from Dec '08/Jan '09 TJ newsletter. The background was embossed with snowflakes and the top was cut using a Tim Holtz on-the-edge die.
This is a druggist I'd like to get to know. He's found the fountain of Youth and bottled it. I need some of that. The background is a page from an old Chemistry Handbook. I used part of an embossing folder for the pharmacist sign.
The other design team members have been busy creating great art pieces to share with you. Be sure and check out their blogs for more delightful inspiration.
Please note that due to the high volume during new releases, that “mounted” stamp collections may take 10 days to ship. We will keep you posted on your order, and thank you so much for visiting our outpost.
Now to share some of the works I created using these stamps.
 |
| Halloween Treats |
 |
| Frosty and Friends |
 |
| Apothecary |
The other design team members have been busy creating great art pieces to share with you. Be sure and check out their blogs for more delightful inspiration.
Tuesday, July 26, 2011
A Dandy Garden

The challenge at Stampotique Designers blog is flower power. My sentiment says "One is nearer God's heart in a garden than anywhere wlse on earth." If dandelions are your flower, then they are your garden. The focal image is from Stampotique. The background paper and sentiment are from Club Scrap. I hope my card makes you smile.
Monday, July 25, 2011
Vintage Christmas Card

This card meets two of my regular challenge sites. The Kraft Journal challenge and the challenge at Creative Belli are both Christmas in July.
Saturday, July 23, 2011
Big Wheels


Friday, July 22, 2011
It's All Perspective

To create my card, I started with a piece of silver metal and embossed it using one of Tim Holtz's texture fades. I highlighted the embossing with black Stazon Ink. The center image is from one of Tim Holtz's atc stamps. The background is colored by smooshing tag cardstock into distress ink sprayed with Perfect Pearl spray. The stamp was stamped with black Adirondack archival ink. The sentiment, also a Tim Holtz stamp, was done in the same way as the image. The result is a rather dramatic card.
Christmas in July Challenge

A Dandy Summer

Looking forward to your version of summertime. Have a great day.
Wednesday, July 20, 2011
Tea and Roses

Color of Money


Another Yahoo group I'm in challenged us to use a tool or product that we hadn't used in a long while. Well, I bought this two part resin a year ago and have been looking at the bottles since then. I finally got the courage to try and use the resin with this challenge. I guess that counts as a product not having been used in a long time (or ever).
Tuesday, July 19, 2011
Floral Hanging

Although I thought I was going to make a card, this project developed into a wall hanging. There are three challenges represented in this work. The Grungy Monday challenge is grungeboard or grungepaper. The Ink on my Fingers Sunday challenge is to build your own flower embellishment. At Creative Belli the challenge is custom made bellies.
Behind this dimensional work is a Heartfelt Creation stamp. I just dimensionalized it. The trellis is made from grungepaper and stained with Walnut distress stain. The nails are made using a silver Viva Decor paint pen. The leaves are die cut using a Spellbinders die. The roses were made using a Sizzix die. Everything was adhered to a piece of cardstock which had been stamped with the stamp and sprayed with forever violet Perfect Pearl Mist and then edged with wild honey and victorian velvet distress inks. Once I had the image panel complete, I realized that it was so dimensional that it really didn't make a good card. So I attached the image panel to a piece of burlap and used the cute hanger to hang it.
Sunday, July 17, 2011
Sewing is a Challenge

Summertime Fun

Two Color Art

Saturday, July 16, 2011
On the Road, Steampunk Style

Friday, July 15, 2011
Bloggers Challenge and a Wedding Wish

 This week's Bloggers Challenge is a great sketch challenge provided by Lisa. I decided to use the Make It Monday Challenge theme at Kraft Journal which is Something Borrowed or Something Blue. As you can see, I went with the blue and with the whole theme which reminded me of a wedding. All of the die cuts are from Spellbinders. The background panel is embossed using a Tim Holtz texture fade. The image and sentiment are from Heartfelt Creations. The embellishments are Jeweled Inspirations from Creative Inspirations Paints. The final touch was to use Rock Candy Stickles on the raised part of the embossing and on the blue lacey edges of the die cuts. There really is an elegant sparkle to the card.
Thursday, July 14, 2011
Every Snowflake is Different

Wednesday, July 13, 2011
Flying Machines

 This card was actually influenced by several challenges. It was a lot of fun to create. I'm kind of in a Steampunk mood ever since Gingersnap gave July the theme of Steampunk. So this card is for the Gingersnap Spicy Supply Challenge 110 -- Gears, Cogs, and Watchbits. The layout is based on Mojo Monday's Challenge 199 sketch. The Ink on my Fingers Sunday challenge 162 is Flying. and finally, the July challenge at Inspiration Emporium is texture. My flying machines are images from a Mailbox Muse collage sheet. The background panel is embossed using a Tim Holtz texture fade on Core'dinations paper and then sanded. The sentiment is from Oxford Impressions.
Tuesday, July 12, 2011
Hot Colors

More Christmas in July

Monday, July 11, 2011
Guest Designer -- Grungy Monday 15

For my project I used Tim's technique as inspiration to create this wall hanging for my little studio. I love trying Tim's techniques since they are so inspirational and informative. This technique is so easy.All you need is a few colors of distress ink, some embossing powder and a stamp. Any other embellishing is up to you.
I started with a 4x6 piece of tag manila paper because I wanted to use this 4x6 inch frame. For the background I used broken china as the base and vintage photo as the highlight. I stamped the word Artist on a tag using several colors of distress ink -- fired brick, faded jeans, victorian velvet, spiced marmalade, dusty concord, and shabby shutters. The colors are a personal choice. Again I used vintage photo along the edges.
For embellishment I used a strip from sheet music (from my stash)which I antiqued using old paper distress. The butterflies were cut using Tim's movers and shakers butterflies and highlighted with a little tissue tape (also Tim's). The flower (a gift from a dear friend) was highlighted using fired brick distress ink.
The frame was purchased at a dollar store. I loved the inner layer. It was made to be covered with tissue tape.
My co - Guest Designer for this week's challenge is Rinda Ontiveros. Why don't you stop by and see what she has created! I hope you are inspired to try this challenge. If you don't have all the supplies called for in the technique, try substituting similar products. Also, if you love the Tim Holtz style why don't you check out the All Things Tim discussion group at Yahoo. Gloria, the list mom, has a Grungy Monday file there where participants can upload their art for the group to admire.
.
Sunday, July 10, 2011
CHAPTER 5 Challenge - Week 2: Tea-things
`And ever since that,' the Hatter went on in a mournful tone, `he won't do a thing I ask! It's always six o'clock now.' A bright idea came into Alice's head. `Is that the reason so many tea-things are put out here?' she asked. `Yes, that's it,' said the Hatter with a sigh: `it's always tea-time, and we've no time to wash the things between whiles.' `Then you keep moving round, I suppose?' said Alice. `Exactly so,' said the Hatter: `as the things get used up.' `But what happens when you come to the beginning again?' Alice ventured to ask.
The Mad Hatter's tea table was full of tea-things, with place settings all the way around and many teapots and teacups. Your challenge this month is to have a teapot or teacup on your project, and, as an option, to use something OTHER than a stamped image as your focal point!
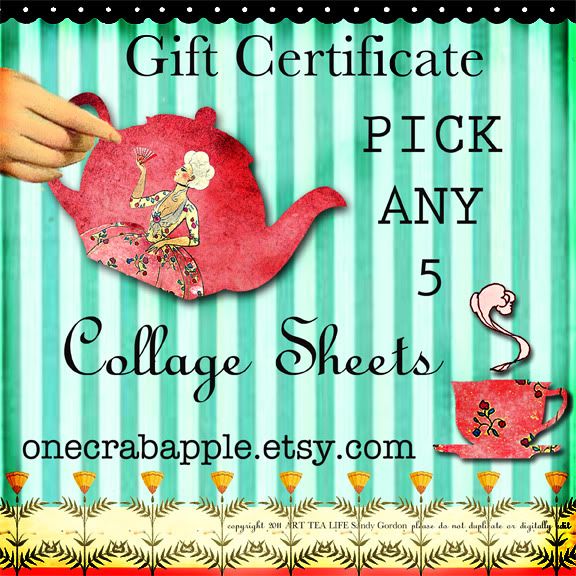
Blog], which has of the most interesting and different Alice in Wonderland categories I've seen! The owner and artist is taking care of some family priorities, so if the store is closed when you visit, just put in your email in to be notified when it reopens. It is well worth waiting for I promise; most of the design team members had a difficult time making their choices and a couple of us needed all of everything in the Alice category! The winner will have their choice of five collage sheets from One Crabapple!
July is a long month, so you have almost four weeks to enter your project! Plenty of time for even our stragglers to play along, just be sure to enter before 11:59 p.m. (Eastern Daylight Time, GMT -5:00) on Friday, July 29. The winner and honorable mentions will be announced the last Sunday of the month, July 31.
There were so many cool images on the Alice collage sheets from One Crabapple. I decided to use a banner to showcase as many of the images as I could.

Here are the close ups of the different pennant flags.
 |
| Tea Queen |
 |
| "Who Stole the Tarts?" and "Queen of Hearts, She made some tarts" |
 |
| "It's Always 6 O'Clock" and "No time to say Hello! Good-bye! I'm Late." |
 |
| Tea cups and Tea Pot. |
 |
| "Clean Cups! Move on down!" and Alice herself |
Saturday, July 9, 2011
Faux Marble

Art is a Shadow

The Writing is on the Wall

Celebrating Liberty


Friday, July 8, 2011
Floral Frenzy

Happy Friday everyone.
Thursday, July 7, 2011
Christmas in July

To make my card, I first stamped the holly corners. Then I dry embossed the December calendar with a texture fade from Tim Holtz. I highlighted December and 25 using markers. The pointsettia was stamped on a separate piece of paper by coloring with markers direct to stamp. I roughly cut out the flower and adhered it to the calendar panel. Merry Christmas in July.
Friday, July 1, 2011
Seeds of Liberty

Hope everyone has a fun and safe 4th of July.
Subscribe to:
Posts (Atom)