Showing posts with label I Brake for Challenges. Show all posts

Thursday, November 22, 2012

Joyeux Noel

I love it when great techniques and wonderful stamps come together with a great sketch layout. The Compendium of Curiosities II challenge this week is the texture fade technique from p. 64 of Tim's book. Also on this card is the reflections stamping technique from p.64 --last week's challenge. All of the image and sentiment stamps are from Artistic Outpost with the challenge of anything goes. I Brake for Challenges wants to see holidays. And, of course the sketch I used is from the Mojo Monday challenge. The texture fade is from Sizzix and the Background is made from the reflections stamps of Tim Holtz (Stampers Anonymous)

Friday, October 5, 2012

Gather Love Together

I'm a little late in posting this card. Let's just say I was delayed and then chose a technique which took a little longer than I expected. But it's still Friday and I'm sharing my Blogger's Challenge card. The theme this week is falling for you (love theme with fall colors). The card also works with several other challenges: Simon Says Stamp and Show leaf-spiration; Mojo Monday sketch; I Brake for Challenges - fall; and Artistic Stamper - the Natural World.
The background of my card was made on my gelli plate using fall colors and maple leaves (part of the natural world) from my back yard . Actually it is the ghost print; the positive print will be showing up in the near future. The large, brown circle and the dark green circle die cuts are from Spellbinders. The leaf and branch are from Tim Holtz (Sizzix). All of the stamps are from Club Scrap. I've been wanting to try and use leaves from my tree with the gelli plate. I really like the results I got.
Please feel free to create some art and join in with this week's challenge.


Saturday, September 8, 2012

Week 2, CHAPTER 19: Lovely Garden and Bright Flowers


"...she tried the little golden key in the lock, and to her great delight it fitted! Alice opened the door and found that it led into a small passage, not much larger than a rat-hole: she knelt down and looked along the passage into the loveliest garden you ever saw. How she longed to get out of that dark hall, and wander about among those beds of bright flowers and those cool fountains, but she could not even get her head though the doorway; `and even if my head would go through,' thought poor Alice, `it would be of very little use without my shoulders."-- Chapter 1, Alice's Adventures in Wonderland


Your challenge this month is Garden and/or Flowers! Enter your creations by Friday, September 28, 2012. Multiple entries are allowed, but to count as a separate entry each must be on its own blog post. All entries are welcome, but projects that feature Wonderland will have two chances at the drawing instead of one.
 
The winner will receive 3 digi images from The Stamping Boutique, which has a wonderful Alice in Wonderland line we will be sharing with you! Tracey Malnoski is the owner and illustrator, and she has previously designed stamps for Unity, InStyle, Squigglefly, and The Digi Shack. Her Stamping Boutique has it all: digital images, red rubber stamps, and themes that include fairytale, whimsy, sentimental, and candy. Please visit the Store and their wonderful Challenge Blog!
 
 
My project for this challenge is  a wall plaque depicting Alice in the garden with the talking flowers and the Red Queen in her rose garden.
 

In the corner there is a tag with Alice peeking through the keyhole, looking at the most beautiful gardent she has ever seen.

As we look at the gardens, we see the Cheshire Cat appearing at the top with a sign pointing to the rose garden.

The Red Queen is there in her rose garden. I think she might go after someone's head. There are still white roses to be seen. She does have quite an attitude as you can see.

And here is Alice in the garden with the talking flowers.
A few details about the plaque: All of the images are digis from the Stamping Boutique collection. The coloring was done with distress markers. The background is a flat canvas which has been gessoed and then sprayed with Dylusions sprays. Going up the board between the gardens is a path created with a mixture of Mudd Puddles sticky sand and clear gesso. It made a great place to adhere the sentiment. The talking flower heads are made in molds with air dry clay and then colored using Perfect Pearls. All of the flowers were made with die cuts from both Cheery Lynn and Spellbinders.
The card shown at the top of the blog also uses a Stamping Boutique digi. Although you can't really see in the scan, I added a little fun to the card by cutting a second Alice in the tea cup and attached her with a Wobble spring so she moves when touched or shaken. I am also entering this piece in the I Brake for Challenges digi challenge.


Friday, August 24, 2012

Joy and Wonder

Happy Friday! This week's Bloggers Challenge is one of my favorites--black and white, with a splash of color. As a coincidence, that is also the challenge at Three Muses.  In addition, the challenge at I Brake for Challenges is I Brake for...I Brake for Stamps. My image is from I Brake for Stamps and the sentiment is from Club Scrap.  I love the pop of the green borders against the stark black and white. For fun I added the three green square rhinestones along the bottom.


Thursday, July 19, 2012

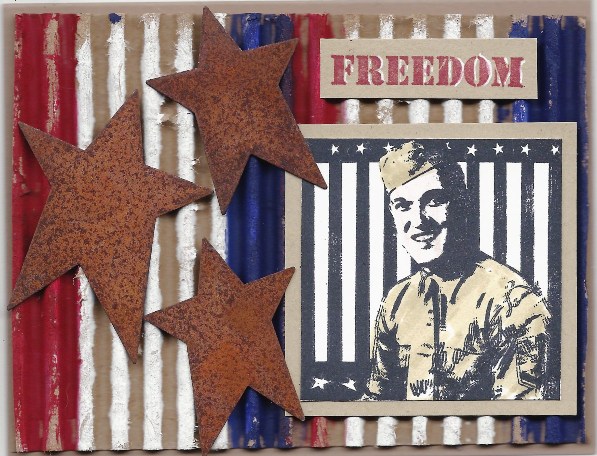
Freedom Stars

Have you ever had a card or art piece that designed itself? That's just about what happened with this card. I was getting ready to work on a card for the Frilly and Funkie challenge which is make my metal altered. I was looking at some rusty metal embellishments that I had purchased from the Funky Boutique. As I held these stars in my hand, I envisioned this card and off to work I went.
The background is corrugated cardboard which I painted with red, white, and blue acrylic paint. The image is from the Artistic Outpost Hero stamps and the sentiment is from the Artistic Outpost She-roes set.
I am also submitting this card to these challenges: Ink on my Fingers Sunday challenge -- embellishments; Simon Says Stamp and Show -- no rules; I Brake for Challenges --red, white, and blue; and the Artistic Outpost July Referral challenge -- anything goes.

Thursday, June 28, 2012

Easel Gift Box

Well, the temperature in Chicago hit 101 today. What better place for me to spend the day than in my cool, basement studio. Today I created an easel gift box.  It actually meets several challenges. At Our Daily Bread Designs the challenge was to use three stamps. I used two sentiments and the bicycle image from the Bicycle stamp set. City Crafters  wants us to create a gift, rather than a card. Put some chocolates in the box and you have a wonderful gift. Creative Belli challenged us to create anything but a card. And I Brake for Challenges wants to see summer fun.
The easel box technique and the watercolor reinker are both techniques from Technique Junkies.

Monday, May 14, 2012

Thanks a Bunch

I had a lot of fun combining a few challenges to make this card.
I began with the sketch challenge from Mojo Monday. The challenge at My Minds Eye is to use MME brads in our work. At the Artistic Stamper the challenge is spots and stripes. I used MME papers with stripes, with spots, and with florals. The striped brad and pink pearl brads worked well with the papers. Both Critter Sketch and I Brake for Challenges had flowers as their theme. The flower stamp is one from I Brake for Stamps. Finally, the sentiment (from Club Scrap) was stamped on a spun sugar dyed ribbon. The challenge at Kraft Journal is a thank you challenge. All of the panels were adhered to a kraft base card.

Friday, March 23, 2012

Easter Joy

As Easter approaches, several of the challenge sites that I participate in have Easter as the theme.  I just received these gorgeous egg dies from Cheery Lynn, so of course, I wanted to use them on my card. I backed each of the fancy diecuts with a bright Easter egg color. The darling chocolate bunny was cut from a Tim Holtz die. The background is dry embossed white on white. Then I added some angelina fibers for the Easter grass. (It's somewhat amazing that I added the grass since I won't let the real Easter grass in my house because it gets all over everything and doesn't vacuum up very well.) The sentiment stamp has been in my collection for a long time and I don't remember the source.
This card is being entered in Blogger's Challenge, the Cheery Lynn challenge, the Sweet Stamps challenge, and I Brake for Challenges.

Wednesday, January 25, 2012

Love Your Style

When I saw that the challenge at I Brake for Challenges was fancy folds, I thought of one of my favorite folds from the Technique Junkies Newsletter, the Z-fold card (Aug/Sep 2007). I decided to combine this challenge with that of Creative Belli which is fancy frames and Critter Sketch which is 3 embellishments. My stamps are from the Millinery Misses collection at Rogue Redhead Designs. All of the cardstock is from Club Scrap. My frame is one of the picot circles die cuts from Spellbinders. My embellishments --sticky back pearls around frame, blue flower button, and bling border have been in my stash for a long time waiting for their time to shine.

Tuesday, January 10, 2012

With This Kiss

The color challenge at Gingersnap Creations is soft yellows and white. The challenge at I Brake for Challenges is CAS. For my card, I used a piece of white cardstock for the base. Using pan pastels and a rectangular sponge I added two shades of yellow for background. To avoid smearing I sprayed the background with Workable Fixative and then stamped my image (from I Brake for Stamps). The result is a clean and simple, but pretty card.

Monday, December 19, 2011

Vintage Santa

I can't let the Christmas season pass without using a Santa stamp from one of my favorite Christmas stamp sets -- Snowy Woods from Artistic Outpost.
I just love the look of the vintage Santas. On this card I stamped my image in coffee on Kraft cardstock. Using a sea sponge, I sponged winter white Creative Inspirations paint around the snowy areas of the card. Then I sponged tan over the card to get a vintage look. I stamped Santa a second time, cut him out, painted him with fairy dust, and attached him with pop dots over the original Santa.
I layered the image on a black panel. The background panel was created from glassine paper which I crumpled, painted with turquoise CI paint, and highlighted with broken china distress ink. Everything was layerd onto a turquoise card base. The result is a very shimmery, vintage Santa card.
I am entering the following challenges: Ink on My Fingers Sunday Challenge -- Santa Claus, Take a Word -- Sepia, and I Brake for Challenges --vintage.

Friday, November 4, 2011

Autumn Colors

While I don't like the chill of autumn and the forecasting of winter, I do love the
colors of autumn. This week's Bloggers Challenge is a wonderful sketch provided by our challenge leader, Lisa. Although simple in layout, the design is very eye catching. My back panel is a piece of design paper from Club Scrap. The taller panel is stamped with a music background stamp from I Brake for Stamps. The floral panel is a scrap of  designer paper from my stash. The flower is made of layers of stamped flowers from Heartfelt Creations. The raffia ribbon is a piece I had in my stash.
This card is also being entered into the challenge at I Brake for Challenges which is whiteout (Use no white or cream cardstock in your art piece.)
Happy Friday everyone!

Friday, October 28, 2011

Sir Jack-O-Lantern

I'll be sorry to see the Halloween season come to an end. It has been so much fun creating Halloween art. This week's Bloggers Challenge is Happy Haunting. I just received my Pumpkin Jack die (Tim Holtz) in the mail and had to use it. I had planned to use the faux leather technique on the orange paper for texture, but I found this paper which already had texture, so I just added some ripe persimmon distress ink direct to paper. I don't have the Movers and Shakers face die, so I improvised. I used the On the Edge Pennants die. The eyes and nose are cut from the larger pennant. The mouth is the part that comes between the cutting of both pennants. The background is made using the double embossing technique. First I embossed the wavy lines and highlighted them in purple (seedless preserves distress ink); then, I used the Halloween words texture fade and highlighted the raised areas with ripe persimmon. The monacle and metal "trick" tag I found when I was going through some of my forgotten stash. Timely, eh?
I am entering this card into several challenges this week: Kraft Journal -- Anything Goes (background panel is kraft), Created by Hand -- Halloween/Tag Dies, I Brake for Challenges -- Halloween, and Inspiration Emporium -- Black, Purple, and Orange.
Happy Halloween!

Sunday, October 9, 2011

Wonderful

This card began with the sketch from the Critter Sketch challenge.  The background was done using the Double the Fun technique which was the challenge for Technique Junkies Try That Technique. I did find that cutting package acetate with a Spellbinders die was almost impossible, but the Tim Holtz Sizzix dies went through like butter. Ink on My Fingers Sunday Challenge was looking for the complementary colors blue and orange.  My main image is from I Brake for Stamps. I thought she was beautiful for the Girl Power challenge at I Brake for Challenges. Her dress was paper pieced, the challenge at Creative Belli. Both the stamp and the paper have been in my collection a long while. The sentiment, from The Angel Company, has also been waiting a long time to be used.

Sunday, September 25, 2011

Autumn Morn

It's the time of the year when Autumn is a popular theme for challenges. This week four of my favorite challenges had autumn as their theme: Stampsmith, Kraft Journal, Tuesday Throwdown, and I Brake for Challenges.

My image is from Stampsmith's Bridal Morn. When I saw the image I envisioned her sitting beneath a tree with leaves beginning to change color. The image is stamped on a very smooth cardstock and is colored with Prisma colored pencils. The background was done with a batik technique. First I stamped the Oak Leaf background stamp (Heartfelt Creations) with versamark and heat embossed it using a clear powder. Then I smooshed the cardstock with spiced marmalade, green olive and mustard distress inks. I wiped the ink off the embossed areas leaving the leaves imprint on an autumn colored background. All of the layers were adhered to a kraft card base.

Monday, August 29, 2011

Travel in Style

This week Simon Says Stamp and Show Travel. I realized that I had many choices for travel images--trains, planes, and automobiles to name a few; so I decided to go with a hot air balloon for fun. As Tim Holtz says, "The Journey is the destination." I used this collage stamp from I Brake For Stamps. The background is blue cardstock that I sponged with winter frost Creative Inspirations Paints. Around the cardstock is an embossed frame highlighted with victorian velvet distress ink. The balloon was stamped a second time on design paper, cut out, and popped over the original stamped balloon. I added a ticket for the sentiment.
I am also adding this image to I Brake for Challenges (challenge shabby chic) since the image is from I Brake for Stamps.

Sunday, August 28, 2011

Once Upon a Midnight...

I've been waiting to use these stamps from Rubber Bandit for a while now. Well today is the day. Kraft Journal challenged us to create something related to Movies, songs, or Books. Of course your recognize Edgar Allen Poe's "The Raven". I Brake for Challenges wants shabby chic and Hels at Ink on my Fingers challenged us to use birds on our art. My card is somewhat CAS, but I think my card meets all three challenges.

Friday, August 12, 2011

Back to School

I guess this is an appropriate posting to be a little late with. My grandson starts kindergarted (in the big school) in a week, so I've been spending a little more special time with him over the last several days. I haven't spent as much time in the studio as I wanted or needed. Two highlights were Pinocchio (the play) and the jellies at the aquarium. In Joshua's words, "It was amazing!"
But now on to my card. Both Bloggers Challenge and I Brake for Challenges had the theme of Back to School. My image is from Artistic Outpost, Think and Wonder. I stamped the image with Versafine Smokey Gray and highlighted the letters with red marker. I used Spellbinders label eighteen to cut the image. The background was made using alcohol inks to look like a blue plaid school uniform and was then cut using the Spellbinders lattice rectangle die. A red ribbon was laced through the lattice edge and tied in a bow. I attached a muse token saying "Knowledge" to the top corner and a pen nib finishes off the letter Z.
I can't wait to see how everyone has interpreted this challenge.

Sunday, July 17, 2011

Summertime Fun

Both I Brake for Challenges and Tuesday Throwdown challenged us to create something fun in the summer sun. I pulled out my scene stamps (Stampscapes) and this cute little boy about to sail his boat and went to work. Both the boy and the flowers are from I Brake for Stamps. I think he is adorable and that he will have a lot of fun sailing his boat in the pond. That seems like great fun in the sun.

Thursday, June 30, 2011

Circle Card

I had a marathon day working on challenges. It was great fun! My first card is a combination of three challenges. Mojo Monday's challenge is a sketch (see left). We had a choice of making a circle card or a square card. I Brake for Challenges is challenging us to make a birthday card. The Critter Sketch Challenge is a recipe challenge -- 2 colors of cardstock, 1 flower, 1 image, and 1 sentiment.
I hope I did justice to all of the challenges. As you can see, I chose the circle card. In order to scan it I put a yellow paper behind the card because the card was white, but the card is actually circular. I adhered the Italian flourish doily die cut (Cherry Lynn die) in gold metallic to the card which I had run through the Xyron.  Then I added white sparkly glitter to the rest of the card front. The center square is stamped with a square Happy Birthday stamp from Stampin' Up and the focal image, the Fennel Silhouette, from I Brake for Stamps. I added the silk flower and the butterfly (a Cherry Lynn die).
As for the Critter Sketch recipe --there are 2 colors of cardstock-white and turquoise, 1 flower, the IBFS Fennel Silhouette image, and the Happy Birthday sentiment.